Microsoft Fabric: Use Copilot to Generate Data Model Synonyms

Microsoft Fabric: Use Copilot to Generate Data Model Synonyms

One of my older posts explains how to enable Copilot on Fabric and how to use Copilot to generate Power BI reports. In this post, I aim to explain yet another use case for Copilot that can help us to make a better and more useful semantic model in Power BI using synonyms. In an old post published in May 2016, I explained how to use Power BI synonyms to take our Power BI Q&A experience to another level. In that post, I explained how we could use synonyms to translate data model objects in different languages so the end-user could ask questions in their native language and get the results in Power BI. That was such a cool use case for synonyms, I suppose, wasn’t it? Fast track to December 2023, I believe the Q&A is still one of the coolest Power BI features that stands out when demoing the solutions to the customers; therefore, it makes absolute sense to use synonyms to improve the Q&A‘s efficiency and accuracy. This blog post explores the possibility of using Copilot to define synonyms in Power BI Desktop.

Prerequisites

As explained here, we first need to enable Copilot on Fabric Service. Please note that the technique explained in this post requires either Power BI Premium Capacity or at least F64 Fabric capacity and won’t work on PPU, Embedded capacities, Fabric capacities smaller than F64 or Fabric Trial (FT) capacities.

We also need to have the latest version of Power BI Desktop installed on our machine. With that, let’s begin.

Using Power BI Copilot to generate synonyms

While defining synonyms for the semantic model objects significantly helps with the Q&A experience, it is still a cumbersome process if done manually. So, if we meet the prerequisites, we can summon Copilot to the rescue. Follow these steps after opening a Power BI file in Power BI Desktop:

  1. Ensure you’re signed into Fabric service with your account
  2. Click the Insert tab
  3. Select the Q&A visual
  4. On the Q&A visual, click the Q&A Setup button shown with a gear icon
  5. On the Q&A Setup window, you must see a message offering to “Improve Q&A with synonyms from Copilot” on top of the window; click the Add synonyms button

The following image shows the preceding steps:

Improve Q&A with synonyms from Power BI Copilot in Microsoft Fabric
Improve Q&A with synonyms from Copilot
Continue reading “Microsoft Fabric: Use Copilot to Generate Data Model Synonyms”

Quick Tips: Find Power BI Desktop Local Port Number with Model Explorer

Quick Tips: Find Power BI Desktop Local Port Number with Model Explorer

In March 2018, I wrote a blogpost called Four Different Ways to Find Your Power BI Desktop Local Port Number. Last week, Zoe Doughlas from Microsoft left a comment reminding me of a fifth method to get the port which encouraged me to write this quick tip. Thanks to Zoe!

As the name suggests, the blog was about finding Power BI Desktop’s local port number. If you do not have any clue what I mean by local port number, I strongly suggest reading that blog.

This blog focuses on yet another method that wasn’t available back then. Indeed, it is a new feature added to the October 2023 release of Power BI Desktop. This is a Quick Tip so let’s jump straight to the topic and learn how we find the port number (and more) in Power BI Desktop (Oct 2023 and later releases).

Prerequisites

As mentioned, this new feature was added to Power BI Desktop’s October 2023; therefore, we must install that release on our local machine. Indeed, the October 2023 release was packed with many other features, including the Model Explorer (the topic of this blog) and the ability to define calculation groups directly in Power BI Desktop. Many of these features are still in preview; hence, they require enabling.

The following few steps explain how to enable Preview Features in Power BI Desktop:

  1. Open Power BI Desktop and click Settings (the gear icon) from the right pane
  2. On the Options page, from the GLOBAL section, click the Preview features tab
  3. Enable the desired features; for this blog, we need the Model explorer and Calculation group authoring
  4. Click OK

The following image shows the above steps:

Enabling Preview Features in Power BI Desktop

Depending on the selected features, you may need to restart your Power BI Desktop to allow them to enable.

Looking at the above image, some of you may ask “Soheil, are you using an older version of Power BI Desktop?” and I am glad you asked. The answer as always is “It depends”. And, this time it depends on the timing of writing this blog which is early December 2023, and the fact that Power BI Desktop November 2023 was released a couple of weeks ago, therefore, Power BI Desktop October 2023 is kind of OLD! And, YES! I installed Power BI Desktop Nov 2023 for the sake of writing this blogpost.

Continue reading “Quick Tips: Find Power BI Desktop Local Port Number with Model Explorer”

Microsoft Fabric: Generating Reports with Copilot

Microsoft Fabric Generating Reports with Copilot on Fabric

In Nov 2023, Microsoft announced Microsoft Fabric’s general availability and Public Preview of Copilot in Microsoft Fabric. In a previous post, I explained what Copilot means to Power BI developers, which is valid for other Fabric developers such as data engineers and data scientists as Copilot for Fabric helps with those experiences as well. But the main focus of this blog post is to discuss the requirements, how to enable Copilot, and how to use it from a Power BI development point of view. So, this blog will not discuss other aspects of Copilot in Microsoft Fabric. With that, let’s begin.

Requirements

Right off the bat, Copilot is only available on Power BI Premium capacities or their equivalent Fabric capacities. So, NO it is NOT available on Power BI Pro or Premium Per User or Power BI Embedded Analytics. So the Power BI items you want to use Copilot on must be in a Workspace assigned to a Power BI Premium P1 or Microsoft Fabric F64 capacities or higher.

You also need to have a Contributor role on the premium workspace.

To use Copilot, your Microsoft Fabric Administrator must enable it from the Fabric Admin Portal. This setting is not available in all regions yet, but Microsoft is gradually rolling it out to more regions.

Useful links:

Enabling Copilot on Fabric Admin Portal

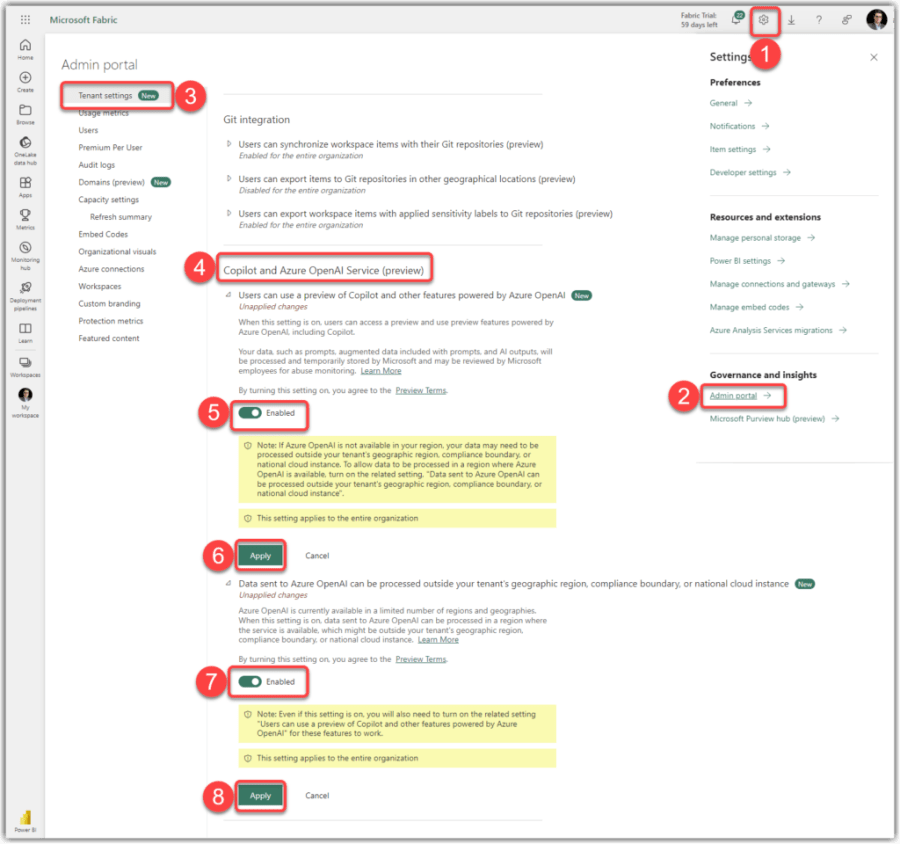
As mentioned before, your Fabric Administrator must enable Copilot features within the Admin Portal. Follow these steps to enable Copilot on your tenant after logging into Microsoft Fabric:

  1. Click Settings (the gear icon on the top right of the page)
  2. Click Admin portal
  3. Ensure that the Tenant setting tab is selected
  4. Scroll all the way down to the Copilot and Azure OpenAI Service (preview)​ section

Note

You can also use the search box and search for OpenAI to find the Copilot and Azure OpenAI Service (preview)​ section.

  1. Enable the Users can use a preview of Copilot and other features powered by Azure OpenAI
  2. Click the Apply button
  3. Enable the ​​​Data sent to Azure OpenAI can be processed outside your tenant’s geographic region, compliance boundary, or national cloud instance
  4. Click the Apply button again

That is it. You enabled the Copilot capabilities on your tenant.

The following image shows the preceding steps:

Enabling Copilot for Power BI in Fabric Service Admin Portal
Enabling Copilot in Fabric Admin Portal
Continue reading “Microsoft Fabric: Generating Reports with Copilot”

Microsoft Fabric: Capacity Cost Management Part 2, Automate Pause/Resume Capacity with Azure Logic Apps

Automate Pause Resume Suspend Fabric Capacity with Azure Logic Apps

In the previous blog post, I explained Microsoft Fabric capacities, shedding light on diverse capacity options and how they influence data projects. We delved into Capacity Units (CUs), pricing nuances, and practical cost control methods, including manually scaling and pausing Fabric capacity. Now, we’re taking the next step in our Microsoft Fabric journey by exploring the possibility of automating the pause and resume process. In this blog post, we’ll unlock the secrets to seamlessly managing your Fabric Capacity with automation that helps us save time and resources while optimising the usage of data and analytics workloads.

Right off the bat, this is a rather long blog, so I added a bonus section at the end for those who are reading from the beginning to the end. With that, let’s dive in!

The Problem

As we have learned in the previous blog post, one way to manage our Fabric capacity costs is to pause the capacity while not in use and resume it again when needed. While this can help with cost management, as it is a manual process, it is prone to human error, which makes it impractical in the long run.

The Solution

A more practical solution is to automate a daily process to pause and resume our Fabric capacity automatically. This can be done by running Azure Management APIs. Depending on our expertise, there are several ways to achieve the goal, such as running APIs on running the APIs via PowerShell (scheduling the runs separately), running the APIs via CloudShell, creating a flow in Power Automate, or creating the workflow in Azure Logic Apps. I prefer the latter, so this blog post explains the method.

I also explain the same scenario on my YouTube channel. Here is the video:

Automating Pause and Resume Fabric Capacity with Azure Logic Apps

Here is the scenario: we are going to create an Azure Logic Apps workflow that automatically does the following:

  • Check the time of the day
  • If it is between 8 am to 4 pm:
  • Check the status of the Fabric capacity
  • If the capacity is paused, then resume it, otherwise do nothing
  • If it is after 4 pm and before 8 am:
  • Check the status of the Fabric capacity
  • If the capacity is resumed, then pause it, otherwise do nothing

Follow these steps to implement the scenario in Azure Logic Apps:

  1. Login to Azure Portal and search for “Logic App
  2. Click the Logic App service
Finding Logic Apps on Azure Portal

This navigates us to the Logic App service. If you currently have existing Logic Apps workflows, they will appear here.

Continue reading “Microsoft Fabric: Capacity Cost Management Part 2, Automate Pause/Resume Capacity with Azure Logic Apps”